There are common methods for taking screenshot on any Surface Device you may have including the newly launched Surface Go 2 and Surface Book 3. Once you go through this guide, you will be able to take screenshots on any Surface Device and share your gameplay snapshots (although there’s Xbox Game Bar for doing just that), webpages or anything displayed on your screen.

Method 1: Screenshot on Original Surface to Surface Pro 3
The first method, however, will only work on the original Surface through Surface Pro 3. The first 3 iterations of Surface feature the Windows button at the bottom of the screen so it is fairly easy to take a screenshot on those devices.
Step 1: Holding the Windows button, push the ‘Volume Down’ button (it’s the button with the minus sign) on the side of your tablet.
The screen will dim and come back to its original brightness, which indicates that a screenshot has been taken.
Step 2: It’s time to locate the screenshot that you just took. By default, it will be saved to the Pictures folder (‘Pictures’ folder inside your [account’s name] folder within the ‘Users’ folder in C:). Did I overcomplicate that? Just open ‘This PC’ and head into the ‘Pictures’ folder from the ‘Quick Access’ list on the left.
Your screenshots will be saved to the ‘Screenshots’ folder inside the ‘Pictures’ folder.
Method 2: For Devices Without ‘Print Screen’ Key
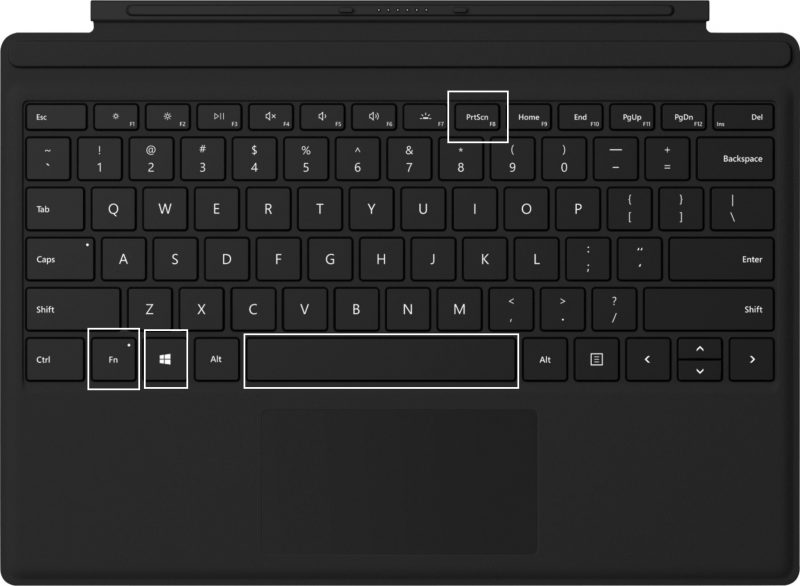
All Type Covers released for devices before Surface Pro 4 lack the ‘Print Screen’ key on the function bar (top most row). However, you can take a screenshot from those versions of Type Covers using a combination of 3 buttons.
Function Key+Windows+Space Bar
Make sure that your press the keys in chronological order. Press and hold all 3 buttons simultaneously and your screen will dim. You just took a screenshot!

Screenshot on Surface Pro 4 and Up
Surface Pro 4 and its successors don’t feature the Windows button integrated into the screen. Therefore, the steps in Method 1 have to be slightly modified. Press and hold the ‘Power Down’ button and tap the ‘Volume Up’ button (remember it was ‘Volume Down’ before) to take a full screen snapshot.
Method 3: Using the Print Screen Key Featured in Newer Type Cover Models
‘Print Screen’ key does what it’s supposed to do. You may have noticed that ‘Print Screen’ and ‘F7’ are assigned to a single key on the function bar of your Type Cover. The keys on the function bar serve two purposes depending upon the LED on ‘Fn’ key located at the bottom left. If the LED on the ‘Fn’ key is not glowing, the features listed above the ‘Fx’ buttons will work.
Simply pressing the ‘PrintScrn’ key will save the screenshot to your ‘Pictures’ folder in OneDrive. Make sure that you have enabled direct uploads to OneDrive before taking screenshots with a single tap of the ‘PrintScrn’ key. The screenshot will only be sent to your clipboard (not saved permanently) if you haven’t enabled the above-mentioned OneDrive feature.
We thought you might like this. Surface Book 3: Old Case with New Hardware
If you use the combination of ‘Windows + PrtScrn’, the screenshot will be saved to your local hard drive in the ‘Screenshots’ folder.
Method 4: Taking Screenshot on Surface Using Surface Pen
In order to take screenshots with the Surface Pen, you have to do a little configuration in the ‘Settings’. Click on the ‘Cog’ icon (located above the Power Button on Start Menu) to open ‘Settings’ and go into the ‘Devices’ tab. You will see a list of built-in devices and peripherals (if any) attached to your Surface. Choose the ‘Pen & Windows Ink’ option and find the ‘Pen Shortcuts’ heading. You can modify the assignments for single click, double click and press and hold combinations.
You can also use apps built into Windows 10 (Snipping Tools, for instance) to take screenshots but that works on any Windows 10 device out there. We will be covering such dedicated ‘Screenshot Applications’ for Windows 10 in an upcoming guide.


